Mục Lục
Tại sao lại viết về những phiên bản cũ này?
Tính tới thời điểm viết bài thì Java đã ra đời tới phiên bản 22, được phát hành vào ngày 19 tháng 3 năm 2024, vậy mà tiêu đề bài viết này mình chỉ đề cập đến java 8, 11 và 17? có phải là quá outdate rồi không?
Thực ra là cũng không phải quá outdate cho lắm, chỉ đơn giản là mình muốn viết một bài đề cập tới những phiên bản Java mà đa số các công ty product hoặc outsource bây giờ đang sử dụng nhiều, việc nắm bắt và hiểu rõ các phiên bản này càng làm bản thân có giá trị cũng như tìm kiếm được nhiều công việc hơn trong ngành, ít nhất là ở Việt Nam.
Hơn nữa việc các phiên bản mới gần đây như 21 LTS hay 22 được ra mắt có vẻ như đang chưa có nhiều công ty triển khai trên production cũng như thử nghiệm hết những tính năng hay ho của nó, đặc biệt là những công ty làm về mảng banking, finance hoặc những dự án đã chạy trên những phiên bản Java quá cũ, đơn giản là việc migration Java từ bản thấp lên những bản version cao hơn đem đến rất nhiều rủi ro, thời gian cũng như công sức của các kĩ sư.
Được rồi, giờ mình sẽ đi vào phần chính của bài viết
Sự đổi mới trong Java 8
JDK 8, ra mắt vào tháng 3 năm 2014, đã mang đến nhiều cải tiến và tính năng mới giúp Java trở nên mạnh mẽ hơn, tiện dụng hơn cho các lập trình viên. Dưới đây là những thay đổi chi tiết trong JDK 8
Lambda Expressions
Lambda expressions là một trong những tính năng quan trọng nhất của JDK 8, nó giúp các bạn viết mã ngắn gọn và dễ đọc hơn bằng cách giới thiệu cú pháp biểu thức lambda.
// Lambda expression to iterate through a list
List<String> names = Arrays.asList("John", "Jane", "Jack");
names.forEach(name -> System.out.println(name));

// Lambda expression with multiple parameters
BiFunction<Integer, Integer, Integer> add = (a, b) -> a + b;
System.out.println(add.apply(5, 3)); // Output: 8

// Lambda expression for sorting a list
List<String> animals = Arrays.asList("cat", "dog", "elephant");
Collections.sort(animals, (a, b) -> a.compareTo(b));
System.out.println(animals); // Output: [cat, dog, elephant]
Phong cách viết code kiểu lambda này đã trở nên cực kì phổ biến ở thời điểm hiện tại rồi.
Stream API
Stream API cung cấp một cách xử lý tập hợp dữ liệu theo phong cách lập trình hàm, các thao tác như filter, map, reduce,… vân vân được thực hiện cực dễ dàng
List<String> names = Arrays.asList("John", "Jane", "Jack");
List<String> filteredNames = names.stream()
                                  .filter(name -> name.startsWith("J"))
                                  .collect(Collectors.toList());
Chi tiết về stream các bạn có thể xem thêm ở bài viết Best practice trong việc sử dụng Java Stream mình đã từng viết.
Default Methods
Default methods trong các interface cho phép thêm các phương thức mặc định mà không phá vỡ các lớp đã hiện thực hóa interface đó.
interface Vehicle {
    default void print() {
        System.out.println("This is a vehicle");
    }

    void speed();
}

class Car implements Vehicle {
    @Override
    public void speed() {
        System.out.println("The car is speeding");
    }
}

public class Main {
    public static void main(String[] args) {
        Car car = new Car();
        car.print(); // Output: This is a vehicle
        car.speed(); // Output: The car is speeding
    }
}
Mình sử dụng nhiều phương thức default nhất là trong những hàm mapper, có sử dụng mapstruct, cực kì tiện lợi khi cần bổ sung hoặc thay đổi dữ liệu gì đó.
New Date and Time API
Java 8 giới thiệu gói java.time với các lớp mạnh mẽ hơn để làm việc với ngày và giờ, được thiết kế để khắc phục những hạn chế của các lớp java.util.Date và java.util.Calendar.
// Example of LocalDate
LocalDate today = LocalDate.now();
LocalDate birthday = LocalDate.of(1990, Month.JANUARY, 1);
Period age = Period.between(birthday, today);
System.out.println("Age: " + age.getYears());

// Example of LocalTime
LocalTime now = LocalTime.now();
LocalTime bedtime = LocalTime.of(22, 30);
Duration untilBedtime = Duration.between(now, bedtime);
System.out.println("Hours until bedtime: " + untilBedtime.toHours());

// Example of ZonedDateTime
ZonedDateTime currentMeeting = ZonedDateTime.now();
ZonedDateTime nextMeeting = currentMeeting.plus(1, ChronoUnit.WEEKS);
System.out.println("Next meeting: " + nextMeeting);
Nashorn JavaScript Engine
Nashorn JavaScript Engine là một sự thay thế cho Rhino và cải thiện hiệu suất, cho phép tích hợp JavaScript trong ứng dụng Java một cách hiệu quả hơn.
import javax.script.ScriptEngine;
import javax.script.ScriptEngineManager;
import javax.script.ScriptException;

public class Main {
    public static void main(String[] args) {
        // Tạo một ScriptEngineManager để quản lý các engine
        ScriptEngineManager manager = new ScriptEngineManager();

        // Lấy engine Nashorn theo tên "nashorn"
        ScriptEngine engine = manager.getEngineByName("nashorn");

        if (engine != null) {
            try {

                engine.eval("print('Hello, Nashorn');");


                String script = "var welcome = 'Hello, '; " +
                                "var name = 'John'; " +
                                "welcome + name;";
                Object result = engine.eval(script);
                System.out.println(result); // Output: Hello, John
            } catch (ScriptException e) {
                e.printStackTrace();
            }
        } else {
            System.out.println("Nashorn not available");
        }
    }
}
Optional Class
Lớp Optional giúp tránh NullPointerException bằng cách cung cấp một cách thức an toàn để xử lý các giá trị null.
// Example with Optional.ofNullable
Optional<String> name = Optional.ofNullable(null);
System.out.println(name.orElse("Default Name")); // Output: Default Name

// Example with Optional.ifPresent
Optional<String> greeting = Optional.of("Hello");
greeting.ifPresent(System.out::println); // Output: Hello

// Example with Optional.orElseThrow
Optional<String> value = Optional.of("Some Value");
System.out.println(value.orElseThrow(() -> new IllegalArgumentException("Value not found"))); // Output: Some Value
Enhanced Annotations
Java 8 mở rộng khả năng sử dụng annotations, cho phép annotations được sử dụng trên các kiểu (type annotations) và trong các vị trí khác nhau.
// Example of repeating annotations
@Repeatable(Schedules.class)
@interface Schedule {
    String dayOfWeek();
    String hour();
}

@interface Schedules {
    Schedule[] value();
}

@Schedule(dayOfWeek = "Monday", hour = "10:00")
@Schedule(dayOfWeek = "Tuesday", hour = "11:00")
class Meeting {
}

// Example of type annotations
class TypeAnnotationExample<@NonNull T> {
    public void method() throws @NonNull Exception {
    }
}
chi tiết hơn các bạn vào xem ở link của oracle: java-8s-new-type-annotations
Parallel Array Sorting
JDK 8 cung cấp một phương thức mới để sắp xếp mảng một cách song song, giúp cải thiện hiệu suất đối với các mảng lớn.
// Example of parallel sorting
int[] numbers = {5, 3, 1, 4, 2};
Arrays.parallelSort(numbers);
System.out.println(Arrays.toString(numbers)); // Output: [1, 2, 3, 4, 5]

// Example with a large array
int[] largeArray = new int[1000000];
Arrays.parallelSetAll(largeArray, i -> ThreadLocalRandom.current().nextInt());
Arrays.parallelSort(largeArray);
System.out.println("First 10 elements: " + Arrays.toString(Arrays.copyOf(largeArray, 10))); // Output varies
tuy nhiên là không phải lúc nào việc sử dụng parallel cũng đem lại việc cải thiện hiệu suất đáng kể đâu, nên là các bạn hãy cân nhắc sử dụng một cách thích hợp.
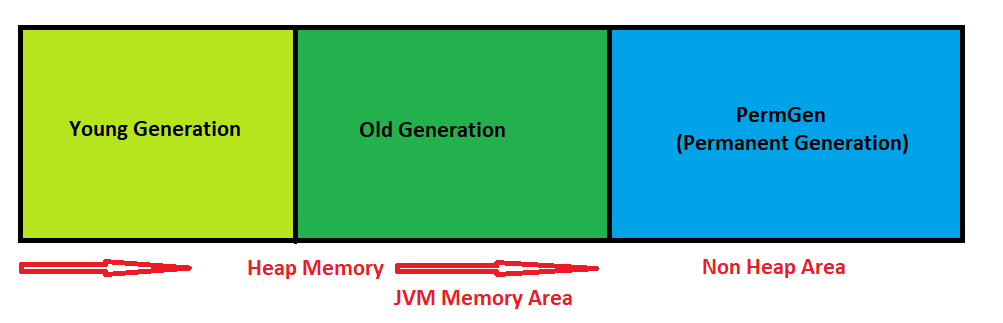
Metaspace
Java 8 thay thế Permanent Generation (PermGen) bằng Metaspace, giúp quản lý bộ nhớ hiệu quả hơn và loại bỏ nhiều vấn đề về hiệu suất liên quan đến PermGen.
Base64 Encoding and Decoding
JDK 8 cung cấp các lớp tiện ích để mã hóa và giải mã Base64, khá là tiện lợi
import java.util.Base64;

// Example of encoding a string
String original = "hello";
String encoded = Base64.getEncoder().encodeToString(original.getBytes());
System.out.println(encoded); // Output: aGVsbG8=

// Example of decoding a string
byte[] decodedBytes = Base64.getDecoder().decode(encoded);
String decoded = new String(decodedBytes);
System.out.println(decoded); // Output: hello

// Example of URL encoding and decoding
String url = "https://www.example.com/?query=java";
String urlEncoded = Base64.getUrlEncoder().encodeToString(url.getBytes());
System.out.println(urlEncoded); // Output varies

String urlDecoded = new String(Base64.getUrlDecoder().decode(urlEncoded));
System.out.println(urlDecoded); // Output: https://www.example.com/?query=java
Concurrency Enhancements
Java 8 có nhiều cải tiến trong lập trình đồng thời, bao gồm các công cụ như CompletableFuture và các phương thức tiện ích trong lớp java.util.concurrent
import java.util.concurrent.CompletableFuture;

public class Main {
    public static void main(String[] args) {
        // Tạo một CompletableFuture không đồng bộ
        CompletableFuture<Void> future = CompletableFuture.runAsync(() -> {
            try {
                Thread.sleep(1000); // Giả lập một tác vụ tốn thời gian
            } catch (InterruptedException e) {
                e.printStackTrace();
            }
            System.out.println("Task is completed!");
        });
        future.join();
    }
}
Sử dụng CompletableFuture để kết hợp kết quả từ nhiều tác vụ không đồng bộ
import java.util.concurrent.CompletableFuture;
import java.util.concurrent.ExecutionException;

public class Main {
    public static void main(String[] args) {
        CompletableFuture<String> future1 = CompletableFuture.supplyAsync(() -> {
            try {
                Thread.sleep(500);
            } catch (InterruptedException e) {
                e.printStackTrace();
            }
            return "Hello";
        });

        CompletableFuture<String> future2 = CompletableFuture.supplyAsync(() -> {
            try {
                Thread.sleep(700);
            } catch (InterruptedException e) {
                e.printStackTrace();
            }
            return "World";
        });

        // Kết hợp kết quả từ hai tác vụ không đồng bộ
        CompletableFuture<String> combinedFuture = future1.thenCombine(future2, (s1, s2) -> s1 + " " + s2);

        try {
            // Lấy kết quả cuối cùng
            System.out.println(combinedFuture.get()); // Output: Hello World
        } catch (InterruptedException | ExecutionException e) {
            e.printStackTrace();
        }
    }
}
Sử dụng CompletableFuture với xử lý lỗi
import java.util.concurrent.CompletableFuture;
import java.util.concurrent.ExecutionException;

public class Main {
    public static void main(String[] args) {
        // Tạo một CompletableFuture có thể gây ra lỗi
        CompletableFuture<String> future = CompletableFuture.supplyAsync(() -> {
            if (true) {
                throw new RuntimeException("Something went wrong!");
            }
            return "Success";
        });

        // Xử lý lỗi nếu có
        future.exceptionally(ex -> {
            System.out.println("Error: " + ex.getMessage());
            return "Fallback result";
        }).thenAccept(result -> System.out.println(result)); // Output: Error: Something went wrong! / Fallback result
    }
}
Sử dụng CompletableFuture để chạy nhiều tác vụ đồng thời và chờ tất cả hoàn thành
import java.util.concurrent.CompletableFuture;
import java.util.concurrent.ExecutionException;
import java.util.List;

public class Main {
    public static void main(String[] args) {
        // Tạo một danh sách các CompletableFuture
        List<CompletableFuture<String>> futures = List.of(
                CompletableFuture.supplyAsync(() -> "Task 1"),
                CompletableFuture.supplyAsync(() -> "Task 2"),
                CompletableFuture.supplyAsync(() -> "Task 3")
        );

        // Chờ tất cả các tác vụ hoàn thành
        CompletableFuture<Void> allOf = CompletableFuture.allOf(futures.toArray(new CompletableFuture[0]));

        // Xử lý kết quả sau khi tất cả các tác vụ hoàn thành
        allOf.thenRun(() -> futures.forEach(future -> {
            try {
                System.out.println(future.get()); // Output: Task 1 / Task 2 / Task 3 (không theo thứ tự cụ thể)
            } catch (InterruptedException | ExecutionException e) {
                e.printStackTrace();
            }
        })).join();
    }
}
Các bạn có thể thấy là java 8 đã thay đổi và đem rất nhiều lợi ích to lớn trong việc phát triển phần mềm, gần như đã rất phổ biến ở thời điểm hiện tại rồi, tuy nhiên mọi thứ vẫn chưa dừng lại và các phiên bản jdk mới vẫn tiếp tục ra mắt và càng ngày càng hoàn thiện hơn.
Java 11 đã thay đổi những gì từ Java 8
Java 11 phát hành vào tháng 9 năm 2018, mang đến nhiều tính năng và cải tiến mới, tập trung vào việc làm cho Java trở nên hiện đại hơn, hiệu quả hơn và dễ sử dụng hơn, dưới đây là những thay đổi và tính năng mới quan trọng trong JDK 11, các bạn cùng xem nhé:
Local-Variable Syntax for Lambda Parameters
Cho phép sử dụng từ khóa var trong biểu thức lambda để suy luận kiểu của tham số.
Hoặc sử dụng từ khóa var giúp đơn giản hóa việc khai báo biến bằng cách cho phép trình biên dịch suy luận kiểu biến từ giá trị được gán cho nó
// Trước JDK 11
List<String> list = List.of("a", "b", "c");
list.forEach((String s) -> System.out.println(s));

// JDK 11
list.forEach((var s) -> System.out.println(s));
public class Main {
    public static void main(String[] args) {
        var message = "Hello, World!"; // String
        var number = 42; // int
        var price = 19.99; // double

        System.out.println(message); // Output: Hello, World!
        System.out.println(number); // Output: 42
        System.out.println(price); // Output: 19.99
    }
}
HttpClient API
HttpClient API được giới thiệu như một tính năng thử nghiệm trong JDK 9, đã được chính thức trong JDK 11, nó hỗ trợ HTTP/2 và WebSocket.
import java.net.URI;
import java.net.http.HttpClient;
import java.net.http.HttpRequest;
import java.net.http.HttpResponse;
import java.net.http.HttpResponse.BodyHandlers;

public class Main {
    public static void main(String[] args) throws Exception {
        HttpClient client = HttpClient.newHttpClient();
        HttpRequest request = HttpRequest.newBuilder()
                .uri(new URI("https://api.github.com"))
                .build();
        HttpResponse<String> response = client.send(request, BodyHandlers.ofString());
        System.out.println(response.body());
    }
}
Nest-Based Access Control
Nest-Based Access Control là một cải tiến trong JDK 11 giúp các lớp lồng nhau (nested classes) có thể truy cập trực tiếp vào các thành viên private của nhau.
Trước JDK 11, để các lớp lồng nhau truy cập thành viên riêng tư của nhau, trình biên dịch sẽ tạo ra các phương thức synthetic bridge. Với Nest-Based Access Control, cơ chế này được đơn giản hóa và bảo mật hơn.
public class OuterClass {
    private String outerField = "Outer Field";

    public void outerMethod() {
        InnerClass inner = new InnerClass();
        System.out.println(inner.innerField); // Truy cập trường của lớp InnerClass
        inner.innerMethod(); // Gọi phương thức của lớp InnerClass
    }

    class InnerClass {
        private String innerField = "Inner Field";

        public void innerMethod() {
            System.out.println(outerField); // Truy cập trường của lớp OuterClass
            outerPrivateMethod(); // Gọi phương thức riêng tư của lớp OuterClass
        }
    }

    private void outerPrivateMethod() {
        System.out.println("Outer private method");
    }

    public static void main(String[] args) {
        OuterClass outer = new OuterClass();
        outer.outerMethod();

        InnerClass inner = outer.new InnerClass();
        inner.innerMethod();
    }
}
Running Java File Directly
# Chạy trực tiếp file Java
java HelloWorld.java
KeyStore Enhancements
Trong Java 11, KeyStore mặc định hỗ trợ một số loại (types) khác nhau, bao gồm:
JKS (Java KeyStore):
- Đây là loại KeyStore mặc định và lâu đời nhất trong Java. Nó sử dụng định dạng file đặc biệt của Java để lưu trữ các khóa và chứng chỉ.
- Hạn chế của JKS là không hỗ trợ lưu trữ các secret key (khóa bí mật).
JCEKS (Java Cryptography Extension KeyStore):
- JCEKS là một loại KeyStore mở rộng của JKS và được cung cấp bởi Java Cryptography Extension (JCE).
- Nó hỗ trợ lưu trữ cả private keys và secret keys, khắc phục hạn chế của JKS.
PKCS12 (Public-Key Cryptography Standards #12):
- PKCS12 là một tiêu chuẩn lưu trữ các thông tin về khóa và chứng chỉ sử dụng định dạng binary. Nó được sử dụng rộng rãi và tương thích với nhiều hệ thống và phần mềm khác nhau.
- PKCS12 hỗ trợ lưu trữ các private keys, secret keys và certificates.
Trong Java 11, loại KeyStore mặc định là PKCS12. Điều này có nghĩa là nếu bạn không chỉ định loại KeyStore khi tạo hoặc tải KeyStore, nó sẽ sử dụng PKCS12.
import java.io.FileOutputStream;
import java.io.IOException;
import java.security.KeyPair;
import java.security.KeyPairGenerator;
import java.security.KeyStore;
import java.security.cert.Certificate;
import java.security.cert.CertificateException;
import java.security.cert.X509Certificate;
import java.math.BigInteger;
import java.util.Date;
import javax.security.auth.x500.X500Principal;
import sun.security.x509.CertificateAlgorithmId;
import sun.security.x509.CertificateIssuerName;
import sun.security.x509.CertificateSerialNumber;
import sun.security.x509.CertificateSubjectName;
import sun.security.x509.CertificateValidity;
import sun.security.x509.X500Name;
import sun.security.x509.X509CertInfo;
import sun.security.x509.X509CertImpl;
import sun.security.x509.AlgorithmId;

public class DefaultKeyStoreExample {
    public static void main(String[] args) {
        try {
            // Tạo một instance của KeyStore mặc định (PKCS12)
            KeyStore keyStore = KeyStore.getInstance(KeyStore.getDefaultType());
            keyStore.load(null, null);

            // Tạo một cặp khóa (key pair)
            KeyPairGenerator keyPairGenerator = KeyPairGenerator.getInstance("RSA");
            keyPairGenerator.initialize(2048);
            KeyPair keyPair = keyPairGenerator.generateKeyPair();

            // Tạo một certificate tự ký (self-signed certificate)
            X509CertInfo certInfo = new X509CertInfo();
            Date from = new Date();
            Date to = new Date(from.getTime() + 365L * 24L * 60L * 60L * 1000L);
            CertificateValidity interval = new CertificateValidity(from, to);
            BigInteger serialNumber = new BigInteger(64, new java.security.SecureRandom());
            X500Name owner = new X500Name("CN=Test, L=London, C=GB");

            certInfo.set(X509CertInfo.VALIDITY, interval);
            certInfo.set(X509CertInfo.SERIAL_NUMBER, new CertificateSerialNumber(serialNumber));
            certInfo.set(X509CertInfo.SUBJECT, new CertificateSubjectName(owner));
            certInfo.set(X509CertInfo.ISSUER, new CertificateIssuerName(owner));
            certInfo.set(X509CertInfo.KEY, new sun.security.x509.CertificateX509Key(keyPair.getPublic()));
            certInfo.set(X509CertInfo.VERSION, new CertificateVersion(CertificateVersion.V3));
            AlgorithmId algo = new AlgorithmId(AlgorithmId.sha256WithRSAEncryption_oid);
            certInfo.set(X509CertInfo.ALGORITHM_ID, new CertificateAlgorithmId(algo));

            // Sign the certificate
            X509CertImpl cert = new X509CertImpl(certInfo);
            cert.sign(keyPair.getPrivate(), "SHA256withRSA");

            // Đặt private key và certificate vào KeyStore
            keyStore.setKeyEntry("mykey", keyPair.getPrivate(), "password".toCharArray(), new Certificate[]{cert});

            // Lưu KeyStore vào file
            try (FileOutputStream fos = new FileOutputStream("mykeystore.p12")) {
                keyStore.store(fos, "keystorepassword".toCharArray());
            }
        } catch (Exception e) {
            e.printStackTrace();
        }
    }
}
New String Methods
Java 11 giới thiệu nhiều phương thức mới cho lớp String để làm việc với chuỗi một cách hiệu quả hơn.
// strip(), stripLeading(), stripTrailing()
String str = "  Java 11  ";
System.out.println(str.strip()); // "Java 11"
System.out.println(str.stripLeading()); // "Java 11  "
System.out.println(str.stripTrailing()); // "  Java 11"

// repeat(int)
System.out.println("Java".repeat(3)); // "JavaJavaJava"

// lines()
String multiline = "This\nis\na\nmultiline\nstring";
multiline.lines().forEach(System.out::println);
Java 11 đã có nhiều sự thay đổi rồi, vậy Java 17 thì có gì mới?
Sealed Classes
Được gọi là niêm phong class, bản chất nó là việc giới hạn sự kế thừa của class và interface
public sealed class Vehicle permits Car, Truck, Motorcycle {
    private final String brand;

    public Vehicle(String brand) {
        this.brand = brand;
    }

    public String getBrand() {
        return brand;
    }
}

public final class Car extends Vehicle {
    private final int numberOfDoors;

    public Car(String brand, int numberOfDoors) {
        super(brand);
        this.numberOfDoors = numberOfDoors;
    }

    public int getNumberOfDoors() {
        return numberOfDoors;
    }
}

public final class Truck extends Vehicle {
    private final double loadCapacity;

    public Truck(String brand, double loadCapacity) {
        super(brand);
        this.loadCapacity = loadCapacity;
    }

    public double getLoadCapacity() {
        return loadCapacity;
    }
}

public final class Motorcycle extends Vehicle {
    private final boolean hasSidecar;

    public Motorcycle(String brand, boolean hasSidecar) {
        super(brand);
        this.hasSidecar = hasSidecar;
    }

    public boolean hasSidecar() {
        return hasSidecar;
    }
}
Ở trên các bạn thấy mình tạo ra class Vehicle có đánh dấu niêm phong (sealed) và chỉ cho phép ba class khác được phép kế thừa là: Car, Truck, Motorcycle
public sealed interface PaymentMethod permits CreditCard, DebitCard, Cash {
    void makePayment(double amount);
}

public final class CreditCard implements PaymentMethod {
    private final String cardNumber;

    public CreditCard(String cardNumber) {
        this.cardNumber = cardNumber;
    }

    @Override
    public void makePayment(double amount) {
        System.out.println("Paid " + amount + " using Credit Card ending in " + cardNumber.substring(cardNumber.length() - 4));
    }
}

public final class DebitCard implements PaymentMethod {
    private final String cardNumber;

    public DebitCard(String cardNumber) {
        this.cardNumber = cardNumber;
    }

    @Override
    public void makePayment(double amount) {
        System.out.println("Paid " + amount + " using Debit Card ending in " + cardNumber.substring(cardNumber.length() - 4));
    }
}

public final class Cash implements PaymentMethod {
    @Override
    public void makePayment(double amount) {
        System.out.println("Paid " + amount + " in cash.");
    }
}
Tương tự như class sealed thì mình tạo ra interface PaymentMethod và chỉ cho phép ba class khác implement lại là: CreditCard, DebitCard, Cash
Điều này đảm bảo những class được cấp quyền thì mới có thể thực thi chức năng, giúp tránh được việc dùng lẫn lộn, tùm lum, dễ kiểm soát hơn, tuy nhiên việc mở rộng có thể dẫn tới cú pháp dài hơn.
Sử dụng null trong Switch Expressions
Java 17 đã loại bỏ NullPointerException tiềm ẩn khi sử dụng switch expressions, như những phiên bản trước thì nếu giá trị biến ở trong switch case là giá trị null, lúc đó các bạn sẽ nhận về 1 exception là NullPointerException.
Tuy nhiên giờ đây chúng ta đã được phép sử dụng giá trị null làm biểu thức bộ chọn trong switch statements mà không cần quan tâm đến check null trước đó nữa.
String value = getStringValue();

switch (value) {
  case null:
    System.out.println("Giá trị null");
    break;
  default:
    System.out.println(value.toUpperCase());
}
Pattern Matching for instanceof
Pattern Matching for instanceof là một tính năng mới giúp cải thiện việc kiểm tra kiểu dữ liệu và trích xuất dữ liệu từ các đối tượng.
Nó cung cấp cú pháp giúp viết ngắn gọn hơn và an toàn hơn so với cách sử dụng truyền thống của toán tử instanceof
Ví dụ trước Java 17, chúng ta phải làm thế này
if (obj instanceof String) {
  String strValue = (String) obj;
  System.out.println(strValue);
} else {
  System.out.println("Không phải kiểu String");
}
Thì giờ Java 17 sẽ viết thế này, trông rất gọn và nhanh phải không ? không cần phải đi ép kiểu như kiểu cũ nữa
if (obj instanceof String strValue) {
  System.out.println(strValue);
} else {
  System.out.println("Không phải kiểu String");
}
Records
Records là một loại class đặc biệt trong Java, được thiết kế để đơn giản hóa việc tạo các class chỉ để chứa dữ liệu. Records tự động sinh ra các phương thức như equals(), hashCode(), toString(), và các phương thức getter cho từng trường dữ liệu của nó.
Loại bỏ luôn việc sử dụng lombok cũng như khai báo final trên class như thông thường, tuy nhiên cân nhắc việc sử dụng record hay là lombok trên class thông thường cũng còn có nhiều tranh cãi nên là mình sẽ có một bài riêng để đề cập về vấn đề này.
Đặc điểm
- Immutable: Các đối tượng record là bất biến (immutable), có nghĩa là sau khi một đối tượng record được tạo, các trường dữ liệu của nó không thể thay đổi.
- Compact syntax: Records có cú pháp ngắn gọn hơn so với các class thông thường.
- Automatically generated methods: Các phương thức
equals(),hashCode(),toString(), và các phương thức getter tự động được sinh ra bởi trình biên dịch.
Cú pháp viết record như sau:
public record Person(
    String firstName,
    String lastName,
    int age,
    String address,
    String city,
    String state,
    String zipCode,
    String country,
    String email,
    String phoneNumber,
    String jobTitle,
    String department,
    String company,
    double salary,
    String employeeId
) {}
Trông rất gọn gàng phải không?
The “new” Nullpointer Exception in Java 17
Trong Java 17 thì nó đã cải tiến về NullPointerExceptions giúp cải thiện trải nghiệm debug và phát triển ứng dụng bằng cách cung cấp thông tin chi tiết hơn về nguyên nhân của lỗi NullPointerException.
Đây là một trong những tính năng quan trọng để giảm thời gian và công sức phát hiện và sửa lỗi của các kĩ sư trong việc lập trình Java, giờ thì không còn phải đọc log NullPointerException xong ngồi dò code xem lỗi ở đâu nữa rồi.
Exception in thread "main" java.lang.NullPointerException: Cannot invoke "String.length()" because "str" is null
    at NullPointerExceptionExample.main(NullPointerExceptionExample.java:4)
Thông báo exception gây ra tại dòng 4, bởi biến str, quá rõ ràng và cần thiết trong việc debug, tracing lỗi, thật sự là công đức vô lượng.
Xem thêm một số bài viết nổi bật dưới đây:
- Best practice trong việc sử dụng Java Stream
- Git flow ở công ty nghìn người sẽ như thế nào
- Học cách sử dụng git patch để giúp mình giúp người
- How to resolve problem with git restore
- Biết sử dụng git cherry-pick để làm việc hiệu quả hơn
- Git revert với Git reset hoạt động như thế nào?
- Git stash giúp bạn trở nên chuyên nghiệp như thế nào
- Lần đầu chinh phục thành công Half Marathon
- Nhìn lại năm 2023 của một kĩ sư phần mềm
- Là kĩ sư phần mềm hãy cố gắng giữ gìn sức khỏe bản thân
- Kĩ năng quản lý căng thẳng cho Developer
- Bạn không giỏi lắng nghe như bạn nghĩ đâu
- Làm việc trong môi trường Agile là như thế nào
- Phỏng vấn dạo kĩ sư phần mềm 2023